thinkcell Assist in PowerPoint
- Home
- Resources
- User manual
- AI-powered slides
- thinkcell Assist in PowerPoint
thinkcell Assist is available with thinkcell AI Suite.
thinkcell Assist is an AI chat feature in PowerPoint that helps you create, review, and edit slides. It supports key aspects of building a high-quality presentation, from drafting editable outlines and shaping a coherent narrative to using data that you can trace to its sources.
Caution: The content that thinkcell Assist generates or transforms may not be accurate. To ensure accuracy, check the following details before you finalize your presentations and workbooks:
- For data analysis, verify key figures against the worksheet or source dataset.
- For derived metrics, confirm formulas and units.
- For translations, review titles, labels, and terminology.
- For summaries and action titles, confirm that claims match what the slide displays.

Open thinkcell Assist in PowerPoint
To open the thinkcell Assist side pane, on the PowerPoint ribbon, select Insert > thinkcell > Assist  .
.
The Assist side pane has six tabs. The following table shows what you can do on each tab.
|
Tab icon |
Tab name |
What you can do |
|---|---|---|
|
|
Chat |
|
|
|
Edit Text |
|
|
|
Translate Slides |
|
|
|
Create Content |
|
|
|
Research Data |
|
|
|
Recent History |
|
Create slide content
Use thinkcell Assist to create text, charts, and other slide content.

On the Chat tab, you can prompt thinkcell Assist to create slide content such as tables, charts, key takeaways, and more.
- Select the slide that you want to generate content for.
- On the PowerPoint ribbon, select Insert > thinkcell > Assist . On the Assist side pane, the Chat tab opens.
- On the Chat tab, enter your prompt in the prompt box, then select Enter. You can tell Assist to pull in information from online sources or attached files (see Upload files to thinkcell Assist).
Assist can generate the following types of slide content:
- Text: Assist can generate key takeaways, slide titles, and other text.
- If your prompt has an obvious answer and makes it clear where the text should go, Assist adds the text directly on the slide.
- If your prompt is open-ended, doesn't specify where to add the text, or asks Assist to replace text that you wrote, Assist first shows the text in its response.
- Shapes and elements: Assist can insert all PowerPoint shapes and all thinkcell elements except Gantt charts. To insert a thinkcell table, see the next bullet point.
- thinkcell tables: To insert a thinkcell table, ask Assist to create a table with the data that you want. Assist displays a preview of the table contents in the chat, as well as the Insert Table button and any online sources that Assist used to generate the content. To add the table to your slide, select Insert Table, then place the table on the slide.
Example prompts
- Research what drove NVIDIA's data center revenue growth from FY2023 to FY2025 and draft three key takeaways. The audience is an investment committee, so keep each takeaway to a single line with a number in it.
- I want to emphasize climate policy on this slide. Create a table that lists the five largest countries in the world by population and their per-capita primary energy consumption.
- Pull BMW's total revenue for the last five fiscal years and insert a column chart in the content area of slide 3, with a CAGR arrow from the first to the last year.

To generate action titles and add an action title to your slide, follow these steps:
- Select the slide that you want to create an action title for.
- On the PowerPoint ribbon, select Insert > thinkcell > Assist .
- On the Assist side pane, select Create Content
 .
. - On the Create Content tab, under Create Action Title, select Suggest action titles. A list of action titles appears.
- If you like an action title in the list, select the title to add it to your slide. To generate a new list of action titles, select Regenerate action titles
 .
.

Note: When you select Regenerate action titles , a new list of action titles replaces the existing list. To keep an action title before generating a new list, add the action title to your slide before selecting Regenerate action titles .
To create an executive summary for selected slides or the entire presentation, follow these steps:
- On the PowerPoint ribbon, select Insert > thinkcell > Assist .
- On the Assist side pane, select Create Content .
- On the Create Content tab, under Create Summary Slide, specify the scope of the summary by selecting Selected Slides or All Slides.
- Select one of the following summary types:
- Slide Contents: Summarizes the full contents of each slide in your selection in a bulleted list.
- Action Titles: Lists the contents of each slide in your selection as short action titles in a bulleted list.
- Select Insert Slide. Assist inserts a slide that contains the summary for your selection.
Look up public company financial data from Morningstar, and use this data to create charts. thinkcell Assist includes access to Morningstar data, so you don't need an additional Morningstar account.
- On the PowerPoint ribbon, select Insert > thinkcell > Assist .
- On the Assist side pane, select Research Data
 .
. - On the Research Data tab, in the Research Financial Data search box, type the name of a company. A list of options appears below the search box as you type. In the list, select the company that you want.

- Select the financial KPIs that you want.
- Select the time frame that you want.
- Select Insert Chart.
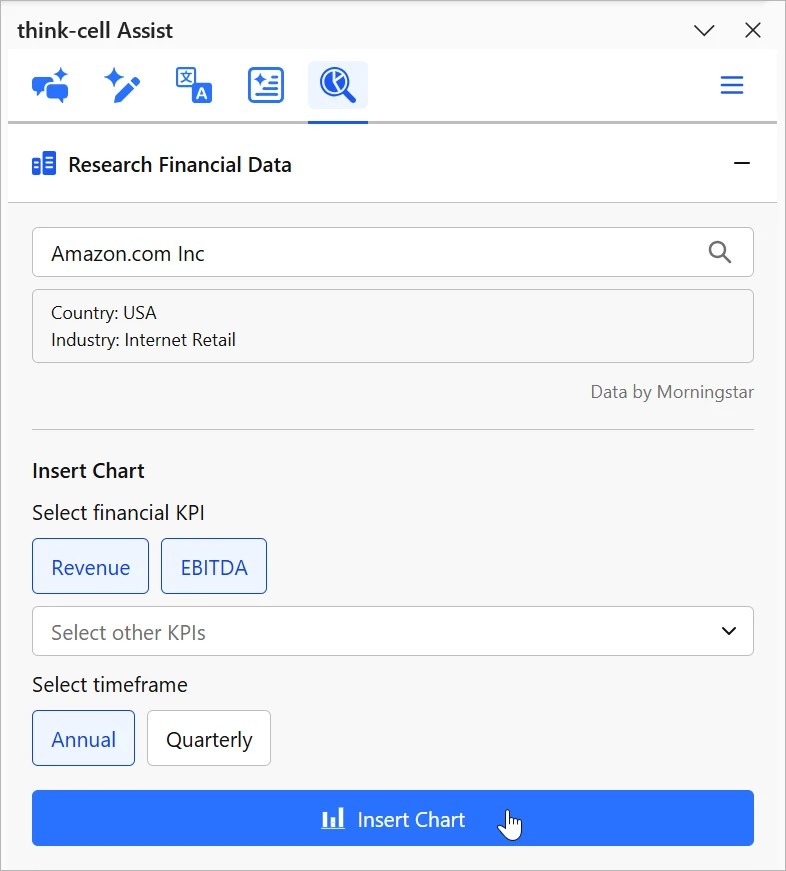
- Place the chart on your slide.


Get surveys and statistics from Statista, and use this data to create charts. thinkcell Assist includes access to Statista Basic, so you don't need an additional Statista account.
- On the PowerPoint ribbon, select Insert > thinkcell > Assist .
- In the Assist side pane, select Research Data .
- On the Research Data tab, in the Research Statistics search box, type keywords for the topic that you want, then select Search
 or Enter. A list of results appears below the search box.
 - Select a result from the list. The Insert Chart button, the Full Details button, and the date of the study appear.
- To learn more about the result on the Statista page, select Full Details. To insert the chart, select Insert Chart, then place the chart on your slide.

Generate slides
Plan and build slides and presentations using thinkcell Assist. Assist is specifically designed to help with key aspects of creating high-quality presentations:
- Clear narratives: Assist clarifies the audience and aim of the presentation, then drafts editable slide outlines that form a coherent argument.
- Traceable research: Assist prioritizes authoritative sources, includes links to sources in the chat, and adds slide footnotes and source appendices where needed.
- Consistent visual style: Assist builds slides using your slide master and any style guides that you upload.
Enter a prompt
On the PowerPoint ribbon, select Insert > thinkcell > Assist . Then, on the Chat tab, enter a prompt that describes one or more slides that you want to build.
Your prompt can include information such as how many slides you want, the presentation's audience, and the presentation's overall goal. You can tell Assist to pull in data from online sources or attached files (see Upload files to thinkcell Assist).
By default, Assist creates slides based on your slide master. You can also tell Assist to create slides based on an attached style guide (see Upload files to thinkcell Assist), or to build slides within a template presentation that contains slides in the style that you want.
When you enter a prompt, Assist asks for any clarification that it needs. For example, Assist might ask you about the intended audience, the message that you want to prioritize, or any inconsistencies in a dataset.
Review the storyboard
If you asked Assist to create more than one slide, Assist first creates a storyboard slide that outlines the planned slides.
A storyboard outlines the following information for each main content slide:
- Topic: What the slide is about
- Category: The slide’s content type, which determines the slide's evidence, structure, and visual form. There are nine possible categories: Read more
- Opening: What the audience needs to know before the body of the presentation
- Structure: How something is organized—for example, a company, process, or framework
- Method: How you arrived at an answer
- Temporal: What changed over time, or what could change
- Evidence: Support for a claim
- Comparison: Analysis of similarities and differences
- Case: What something looks like in practice
- Action: What should happen next
- Backup: Supplementary information for a main slide
- Key message: One sentence that states the takeaway, which becomes the slide's title
In addition to the main content slides, the storyboard may list supporting slides such as cover slides, divider slides, and source appendices.
After the list of slides, Assist adds notes about the slides if needed—for example, corrections or assumptions.
To make changes to the storyboard, see Give feedback on slides. When you've finished reviewing the storyboard, tell Assist to build the draft slides.
Review draft slides
For every slide that Assist plans to create, it first inserts a draft slide that outlines the planned contents. Draft slides are based on the storyboard and your feedback on the storyboard. If you asked Assist to build only one slide, the draft slide is based on your initial prompt.
A draft slide outlines the following information:
- Slide title: The main point of the slide
- Category: The slide’s content type (see Review the storyboard). The category is followed by a short description of the slide's analytical task—for example, for a structure slide, the analytical task might be "Process Flow."
- Narrative note: The slide's role in the argument and the conclusion, decision, or later slide that depends on this slide
- Main content: Three to five points, based on the available evidence, plus any caveats or limitations to these points
- Visualization: The analytical relationship between the main points, followed by the visual form that effectively communicates this relationship
- Sources: The sources that support the slide's claims
To make changes to a draft slide, see Give feedback on slides. When you've finished reviewing the draft slides, tell Assist to build the finished slides.
After Assist builds the finished slides, Assist hides the storyboard and draft slides (see Hide or show a slide). If you want to, you can delete these hidden slides.
You can continue refining the finished slides—for example, by using Assist's slide revision tools (see Review and edit slides).
Give feedback on slides
When you tell Assist to create draft slides from a storyboard, or finished slides from drafts, Assist incorporates feedback from the following sources:
- Edits to the storyboard or draft that you made directly on the slide
- Feedback that you entered in the chat
Review and edit slides
On the Chat tab, you can prompt thinkcell Assist to review slide content—for example, by asking Assist for feedback and explanations.
To review content using Assist, follow these steps:
- On the PowerPoint ribbon, select Insert > thinkcell > Assist . The Chat tab in the Assist side pane opens.
- On the side pane, enter your prompt in the prompt box, then select Enter. For the best results, clearly explain your goals or ask Assist to take on a specific role.
Example prompts
- Imagine that you're a senior consultant at a leading consulting firm. How would you improve this slide before presenting it to a client?
- Act as a financial executive at a large software company. What are the main financial takeaways from this presentation?
- Act as a senior software engineer that specializes in LLMs and cloud computing. Explain the technical terms and concepts on this slide in plain language.
Assist can edit, format, resize, and reposition all PowerPoint shapes and all thinkcell elements except tables and Gantt charts (see Shapes and elements).
For all thinkcell charts except Gantt charts, Assist can edit chart data, Change the segment order or Category order, and add or remove Difference arrows and CAGR arrows.
To edit slides using thinkcell Assist, follow these steps:
- On the PowerPoint ribbon, select Insert > thinkcell > Assist . The Chat tab in the Assist side pane opens.
- In the prompt box, describe the changes that you want to make, then select Enter. You can Upload files to thinkcell Assist as additional input or tell Assist to pull in data from online sources.
- Assist asks for any clarification that it needs. For example, Assist may ask you about the intended layout or the message that you want to highlight.
- Assist updates your slides according to your prompt.
After Assist updates your slides, it may suggest further changes. In the chat, you can select a suggested prompt or enter your own prompt.
Example prompts
- Use the 2026 figures in the attached Excel file to update the chart's data.
- Finalize this slide based on the comments on the slide and in the chat.
- Use the notes and sources on this slide to recreate it as a pitch slide.
- Rebuild this slide in the same style as the previous slide.
- The audience for this presentation are not experts in IoT technology. Rewrite this slide in simpler language that they can understand.
- Throughout the presentation, match the text formatting of PowerPoint shapes to the formatting of the thinkcell elements.
- Align and match the sizes of the charts on slides 2, 3, and 4 to the chart on slide 5.
- Add CAGR arrows to the column charts in this presentation.


 prompts
 Transform text without changing its meaning using preset or custom prompts (see Create custom Edit Text prompts).
The Edit Text tab has the following preset prompts:
- Rewrite: Rewrites and polishes the text without changing its meaning
- Shorten: Makes the text shorter while protecting its meaning
- Bullet Points: Breaks the text down into short bullet points
- Apply Parallel Phrasing: Revises and streamlines the grammatical structure of the text
To apply a prompt to your text, follow these steps:
- Select the text box that contains the text that you want to change. If no text box is selected, Assist adjusts all the text on the current slide.
- On the PowerPoint ribbon, select Insert > thinkcell > Assist .
- In the Assist side pane, select Edit Text .
- Select the prompt that you want to apply to your text.


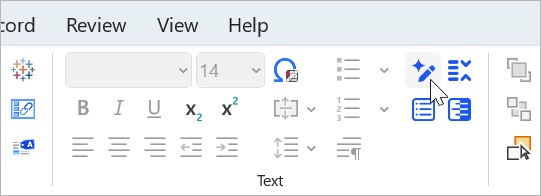
Alternatively, you can apply preset prompts to your text without opening the side pane.
- On the PowerPoint ribbon, go to the thinkcell tab. In the Text group, select the prompt that you want.
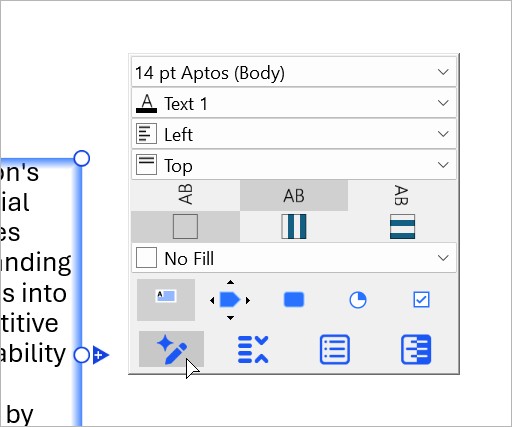
- If you select a thinkcell text box, the mini toolbar opens. At the bottom of the mini toolbar, select the prompt that you want to apply to the selected text.
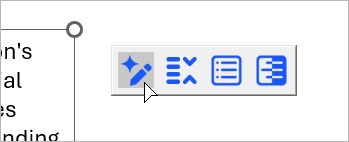
- If you select a PowerPoint text box, the Assist toolbar opens. Select the prompt that you want to apply to the selected text.


 prompts
 You can create custom prompts and access them later on the Edit Text tab.
- On the PowerPoint ribbon, select Insert > thinkcell > Assist .
- In the Assist side pane, select Edit Text .
- On the Edit Text tab, select Configure Prompts
 , then select Create New Prompt
  .
. - In the Create New Prompt menu, in the Display Name text box, enter a name for your prompt. In the Prompt text box, enter your custom prompt.
- To finish creating your custom prompt, select Save Prompt.


Translate slides
Translate the text in your presentation while preserving formatting. To translate your slides, follow these steps:
- On the PowerPoint ribbon, select Insert > thinkcell > Assist .
- In the Assist side pane, select Translate Slides
 .
. - On the Translate Slides tab, select Selected Slides or All Slides.
- On the dropdown menu, select the target language.
- Select Translate Slides.


Upload files to thinkcell Assist
Upload workbooks, presentations, text files, and images as input for thinkcell Assist. Here's what you can do with files that you upload to Assist:
- Create a new presentation from an existing PDF or PowerPoint presentation.
- Analyze an Excel workbook and use its data in your presentation.
- Revise your presentation to match the writing style of a Word document.
- Update the visuals on your slides with uploaded images.
To upload files to Assist, follow these steps:
- On the PowerPoint ribbon, select Insert > thinkcell > Assist . The Chat tab in the Assist side pane opens.
- Do one of the following:
- Drag one or more files to the Assist side pane.
- In the prompt box, select Attach files
 . In the Open dialog, select one or more files, then select Open.
- In the prompt box, enter a prompt that describes how you want Assist to use the uploaded files, then select Enter.
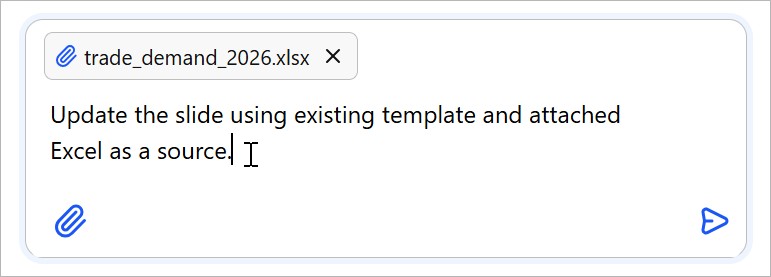

Assist analyzes the file and generates a response. Depending on your prompt, Assist may also update your presentation.
The following table lists the file types and formats that you can upload to Assist.
|
File type |
Supported formats |
|---|---|
|
Microsoft Office |
.pptx, .xlsx, .docx |
|
Image |
.jpeg, .jpg, .png, .gif, .webp |
|
Text |
.pdf, .txt, .md, .csv, .html, .json, .xml |
Access MCP servers in thinkcell Assist
You can access additional data sources, tools, and workflows in thinkcell Assist via Model Context Protocol (MCP) servers. For example, using an MCP server, Assist can work with data from your organization's internal knowledge base.
Administrators and users with local administrative rights can Connect MCP servers to thinkcell Assist.
Depending on how an MCP server defines and authorizes its capabilities, you may be able to refer to these capabilities directly in your prompts. Otherwise, describe what you want to accomplish, and thinkcell Assist will determine whether to use the server's capabilities.
Check MCP server connection status
To check the connection status of MCP servers in thinkcell Assist, follow these steps:
- Open PowerPoint or Excel.
- On the ribbon, select Insert > thinkcell > Assist .
- On the thinkcell Assist side pane, select the Recent History
 tab.
tab.
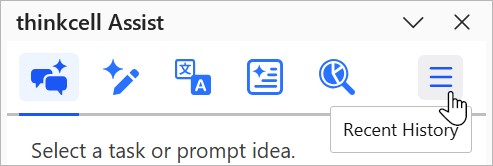
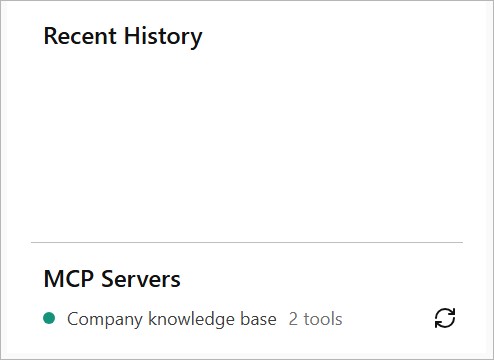
- In the MCP Servers list, check the status indicator next to each server. A green indicator means that the server is connected to Assist. A red indicator means that there's a connection error.


Give feedback on a response
Help us improve thinkcell Assist by sharing your feedback on responses.
- On the Assist side pane, below the response, select thumbs up or thumbs down.
- Optionally, in the text box that appears, you can enter additional feedback that explains what worked well or what needs improvement.
- Select Send.

Need to troubleshoot?
Check our knowledge base