Manage think-cell Library content
- Home
- Resources
- User manual
- think-cell Library: Presentation resources
- Manage think-cell Library content
Choose which slide, image, and icon sources appear in the think-cell Library. You can add slide and image assets from local or shared storage, slide templates that come with think-cell, online stock image and icon providers, and digital asset management providers.
By default, the library displays the sources that are free to use with your think-cell license. For a list of all library sources, see think-cell Library sources. If some of these sources are unavailable, your organization may have its own library settings.
Add, remove, and reorder library sources
To add, remove, and reorder content sources in the think-cell Library, follow these steps:
- Open the library: on the PowerPoint ribbon, go to the Insert tab. In the Slides group, select Library
 .
. - In think-cell Library, in the library sources pane, select Configure Library

- To add a source, select the plus sign (🞡) beside its label. To remove a source, select the X mark (✕) beside its label. To reorder sources, drag their labels.
- To save your changes, select Save Configuration


For administrators
To always display certain sources in the library, see Configure predefined library sources.
To limit which sources users can access, see Enable or disable specific library sources.
Add your slide and image assets to the library
You can add folders that contain slides and images to the think-cell Library. The folders can be on your local computer, network drives, SharePoint, or OneDrive. It's easier and faster to find your assets in the library than in your file manager.

Add assets to the library on Windows
![]()
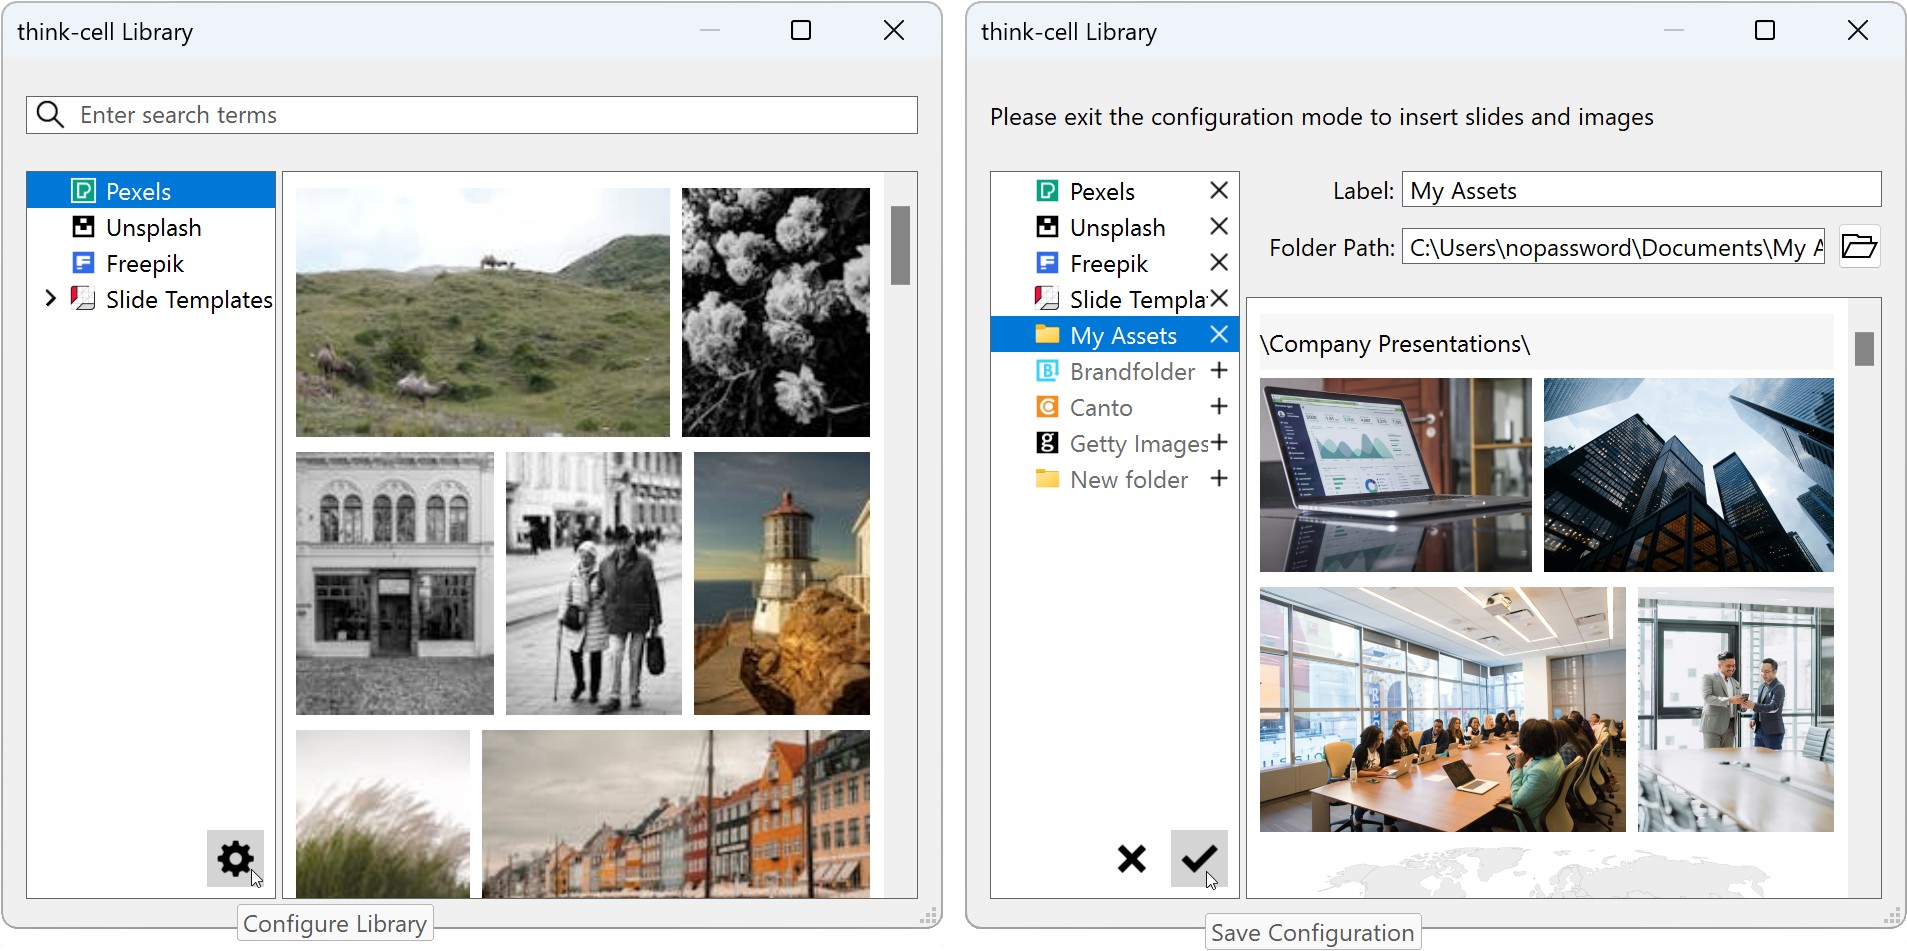
On Windows, you can add an asset folder to the think-cell Library from your local computer, a network drive, or OneDrive.
To add your slide and image assets to the think-cell Library, follow these steps:
- Open the library: on the PowerPoint ribbon, go to the Insert tab. In the Slides group, select Library .
- In think-cell Library, in the library sources pane, select Configure Library
- Select New folder. The Select a folder dialog will open.
- Select a folder that contains PowerPoint files, images, or both. To select a folder, do one of the following:
- In the Select a folder dialog, select the folder that you want to add, then select Select Folder. If you don't see Select a folder, in the think-cell Library dialog, select Browse

- In the think-cell Library dialog, in Folder Path, enter the path of the folder. Then select Enter.
- In the Select a folder dialog, select the folder that you want to add, then select Select Folder. If you don't see Select a folder, in the think-cell Library dialog, select Browse
- In Label, the folder label automatically matches the source's name on your computer. If you want to, you can enter a new folder label.
- When you're finished, select Save Configuration
If you don't see your assets in the library, press F5 to refresh the search results. If you're adding a large number of assets at once, you might need to wait several minutes before all the assets appear in the library. You can close PowerPoint and the library will continue to add the assets in the background.
Any subfolders within the folder that you add also appear in the library sources. To expand and collapse the folders, select the arrowheads (
![]()
![]()
If you add, edit, or delete assets in a folder, these changes automatically appear in the library. If you don't see your changes, press F5 to refresh the search results.
For a list of supported slide and image formats, see Supported file formats.

Add assets from SharePoint to the library
![]()
On Windows, you can add a folder from SharePoint to the think-cell Library.
- In SharePoint, go to the folder that you want to add and select Add shortcut to OneDrive (see View SharePoint files in File Explorer).
- After adding the shortcut, you can see the SharePoint folder in File Explorer. You can now add the folder's contents to the think-cell Library (see Add assets to the library on Windows).
Add assets to the library on Mac
The think-cell Library requires think-cell index files in order to read a folder and display its contents. When you add a folder to the think-cell Library on Windows, think-cell automatically creates hidden index files for that folder.
think-cell cannot create index files on Mac. However, the think-cell Library can read an asset folder on Mac if you first add the folder to the library on Windows, then add the asset folder with the index files to the library on Mac.
If you want the think-cell Library to update whenever you edit the asset folder, see Add folders to the library on Mac via a network drive.
If you don't plan to update the assets in the folder, see Add folders to the library on Mac via local storage.
Note: think-cell 14 for Mac can't read index files that were created using think-cell 13. If you added your assets to the library on Mac using think-cell 13 and have since upgraded to think-cell 14, you will need to add your assets to the library on Mac again.
Add folders to the library on Mac via a network drive
If you want the think-cell Library on Mac to update whenever you edit an asset folder, add the folder to the library via a network drive.
- Add the folder to a network drive, with the following criteria:
- The network drive is shared across Windows and Mac (see Connect your Mac to shared computers and servers).
- The folder is shared with a Windows computer where someone regularly uses think-cell. This ensures that the index files will update when the folder contents change.
- On Windows, add the asset folder to the library (see Add assets to the library on Windows).
- On Mac, open the library: on the PowerPoint ribbon, go to the Insert tab and select Library .
- In think-cell Library, in the library sources pane, select Configure Library
- Select New folder. The Open dialog will open.
- Select the folder on the network drive. To select a folder, do one of the following:
- In the Open dialog, select the folder that you want to add, then select Open. If you don't see the Open dialog, in the think-cell Library dialog, select Browse
- In the think-cell Library dialog, in Folder Path, enter the path of the folder. Then select Enter.
- In the Open dialog, select the folder that you want to add, then select Open. If you don't see the Open dialog, in the think-cell Library dialog, select Browse
- In Label, the folder label automatically matches the source's name on your computer. If you want to, you can enter a new folder label.
- When you're finished, select Save Configuration
Add folders to the library on Mac via local storage
If you don't plan to update the assets in a folder, add the folder to the think-cell Library via local storage.
- On Windows, make sure that the asset folder isn't synced to a cloud storage provider such as OneDrive, otherwise the index files may not appear in the folder. To ensure that the folder isn't synced to cloud storage, you can copy the folder to a USB drive.
- On Windows, add the folder to the library (see Add assets to the library on Windows). If the folder is on a USB drive, add the folder to the library from the drive.
- Copy the asset folder with the index files to local storage on Mac—for example, using a USB drive.
- On Mac, open the library: on the PowerPoint ribbon, go to the Insert tab and select Library .
- In think-cell Library, in the library sources pane, select Configure Library
- Select New folder. The Open dialog will open.
- Select the folder that you want to add to the library. To select a folder, do one of the following:
- In the Open dialog, select the folder that you want to add, then select Open. If you don't see the Open dialog, in the think-cell Library dialog, select Browse
- In the think-cell Library dialog, in Folder Path, enter the path of the folder. Then select Enter.
- In the Open dialog, select the folder that you want to add, then select Open. If you don't see the Open dialog, in the think-cell Library dialog, select Browse
- In Label, the folder label automatically matches the source's name on your computer. If you want to, you can enter a new folder label.
- When you're finished, select Save Configuration
How think-cell protects your data
When you add assets to the think-cell Library, your data stays where it is: think-cell neither uploads your files to a cloud service nor copies them to another location. This also applies to the index files that think-cell generates when you add assets to the library. If your files are stored locally on your computer, you can access them in the library even when you're offline.
The library also preserves user permissions for files. Users who can't access a file in your company network can't see that file in the library either. Additionally, the index files that think-cell generates when you add assets to the library have the same user permissions as the files that they index.
Supported file formats
You can add PowerPoint files and images with the following formats to the think-cell Library.
|
Content type |
Supported formats |
|---|---|
|
PowerPoint file |
|
|
Image |
|
For administrators: If one of these image formats doesn't work in the library, check that the corresponding image codec is installed. To use additional image formats in the library, install their codecs.
Add slide templates to the library
By default, the Slide Templates source is available in the think-cell Library. Slide Templates contains over 450 professionally designed slide templates and objects that come with your think-cell installation, including geographical maps, box plots, and decision trees.
To add your own slide templates to the library, see Add your slide and image assets to the library.
To remove Slide Templates from the library sources, see Add, remove, and reorder library sources.
Add image and icon providers to the library
You can use Pexels, Unsplash, and Freepik in the think-cell Library without an additional subscription. If you have a subscription to Brandfolder, Canto, or Getty Images, you can add these sources to the library as well.
Add Pexels, Unsplash, and Freepik
By default, icon provider Freepik and stock image providers Pexels and Unsplash are available in the think-cell Library. You don't need an account with these providers to use them in the library.
To remove these providers from the library sources, see Add, remove, and reorder library sources.
Add Brandfolder
Add a Brandfolder account to the think-cell Library.
If you manage your Brandfolder account, follow these steps:
- Retrieve your Brandfolder API key: sign in to Brandfolder, go to Integrations, and find your API key.
- In the think-cell Library, select Configure Library
- Enter the API key and select Connect.
- Select Save Configuration
To switch Brandfolder accounts, select Configure Library

If your administrator manages your Brandfolder account, follow these steps:
- In the think-cell Library, select Configure Library
- Select Save Configuration
For administrators: To authenticate a Brandfolder account for think-cell users, see Add a Brandfolder account to the library. To customize your organization's Brandfolder dialog, see Configure Brandfolder library menus. To manage user permissions for Brandfolders and Collections, see Brandfolder's user management guide.
Add Canto
To add a Canto account to the think-cell Library, follow these steps. The Canto account URL must end in canto.com.
- In the think-cell Library, select Configure Library
- In the browser window that opens, select Grant access and provide your account details.
- In the think-cell Library, select Save Configuration
To switch Canto accounts, in the think-cell Library, select Configure Library
Note: think-cell does not save your account details, just the access token provided by Canto. For more information, see OAuth on Wikipedia.
Add Getty Images
To add a Getty Images Premium Access account to the think-cell Library, follow these steps:
- In the think-cell Library, select Configure Library
- In the browser window that opens, select Grant access and provide your account details.
- In the think-cell Library, select Save Configuration
To switch Getty Images accounts, in the think-cell Library, select Configure Library
Note: think-cell does not save your account details, just the access token provided by Getty Images. For more information, see OAuth on Wikipedia.
Need to troubleshoot?
Check our knowledge base