Align and match sizes
- Home
- Resources
- User manual
- think-cell Core: Presentation basics
- think-cell Tools
- Align and match sizes
Alignment and size-matching tools help you quickly arrange think-cell elements and PowerPoint shapes on a slide. Use the reference object for more control when you arrange objects.

Align objects
Learn how to align think-cell elements and PowerPoint shapes on your slide.
- Align objects using PowerPoint commands: Arrange objects using PowerPoint Align tools. You can select a reference object that other slide objects align to.
- Align objects using think-cell guides: When you move or resize objects, think-cell alignment guides help you align objects vertically, horizontally, or both.
- Dynamically align elements: Dynamically aligned elements automatically move or resize to preserve their alignment.
Align objects using PowerPoint commands
You can use PowerPoint commands to align think-cell elements, as well as PowerPoint shapes, to a reference object (see Select a reference object). You can also use PowerPoint commands to arrange objects equal distances from each other.
To align a selection of objects to a reference object, follow these steps:
- Select the objects that you want to align, including at least one think-cell element.
- Select the reference object: hover over an object in your selection until you see a red and white marker at its center, then select the object.
- Do one of the following:
- On the think-cell tab, go to the Layout group.
- On the Shape Format tab, go to the Arrange group and open the Align menu.
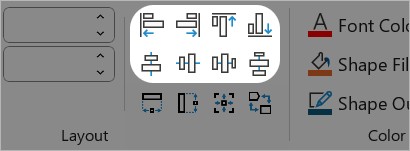
- Select one of the following:
- Align Left

- Align Center

- Align Right

- Align Top

- Align Middle

- Align Bottom

- Align Left
If your selection includes only PowerPoint shapes, or if you don't select a reference object, the alignment behavior is the same as the built-in PowerPoint function—that is, the objects align relative to the outer edges of the selection.
If you select a single object, it aligns relative to the slide.
Align objects using think-cell guides
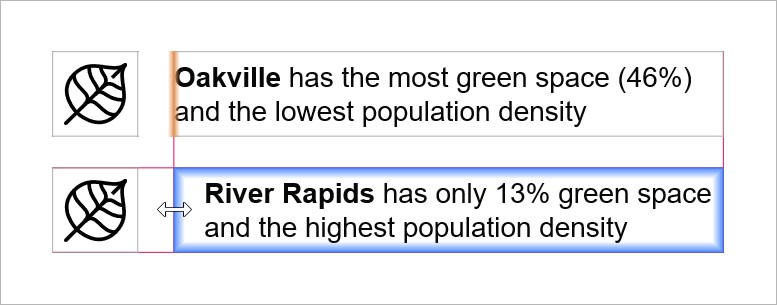
When moving or resizing elements, think-cell guides help you align elements to other slide objects.
- Select a think-cell element and start moving it, or start dragging one of the element's resize handles.
- Red lines appear when you align one of the element's edges to the edge of another element or a PowerPoint shape. If you're dragging a resize handle, the edge that you're aligning to has an orange highlight. You can also align elements to PowerPoint guides and gridlines.
You can also select more than one element and align your selection to other objects on the slide.
Dynamically align elements
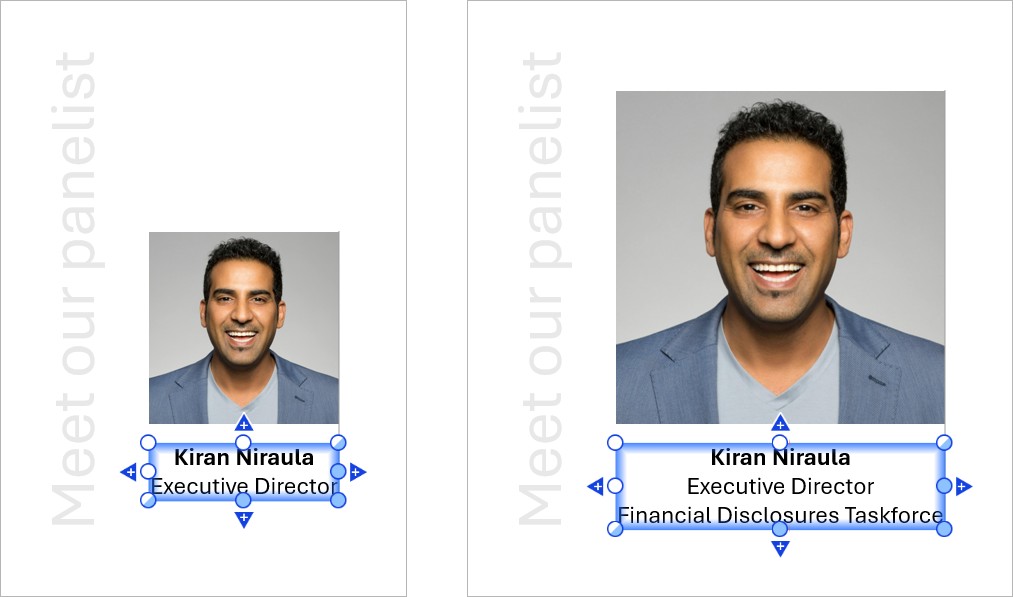
As part of think-cell's automatic layout, you can create dynamic alignments between think-cell elements. When you adjust a dynamically aligned element, the other elements in the alignment move or resize to preserve the alignment.
For example, you can align a text box and an image so that the image always matches the width of the text box, even if you make the text longer or shorter.
To learn more about dynamic alignment, see the following topics:
Match object sizes
You can match the width, height, or size of two or more objects.
The size-matching tools distort PowerPoint images. To avoid distorting PowerPoint images, we recommend that you Convert PowerPoint shapes into think-cell images or use think-cell images.
To match object sizes, follow these steps:
- Select the objects whose sizes you want to match (see Select objects). Your selection can include think-cell elements, PowerPoint shapes, or both.
- If your selection includes at least one think-cell element, you can Select a reference object. The width, height, or size of all selected objects will match the width, height, or size of the reference object. If your selection includes only PowerPoint shapes, the shapes will match the first object that you select.
- Do one of the following:
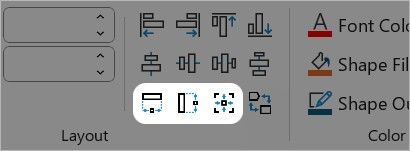
- On the think-cell tab, in the Layout group, select Same Width
 , Same Height
  , or Same Size
  .
. - On the Shape Format tab, in the think-cell group, select Same Width , Same Height , or Same Size .
- Right-click your selection to open the context menu, then select Same Width


- On the think-cell tab, in the Layout group, select Same Width
Modify matched dimensions
If you match the width, height, or size of unlocked elements, you can modify the elements' matched dimensions. For example, if you match the width of two elements, you can modify the width of both elements at the same time.
To modify matched dimensions, follow these steps:
- Make sure that the edges along the dimension that you want to match are unlocked. For example, if you want to match the width of two elements, make sure that the left and right edges of both elements are unlocked (see Unlock the edges of elements).
- Match the elements' dimensions (see Match object sizes). Blue size-constraint arrows appear along the matched dimensions.
- Select one of the size-constraint arrows to open the Size Constraint combo box. In Size Constraint, do one of the following:
- In the text box, enter a value and unit. For example, enter
12 mmor1/2 slide height. If you don't enter a unit, think-cell interprets the value in points (pt). - On the dropdown menu, select one of the following:
- Equal sign (=): Automatically adjust the matched dimensions based on the slide layout, while keeping the adjusted dimensions equal.
- A value and unit
- In the text box, enter a value and unit. For example, enter
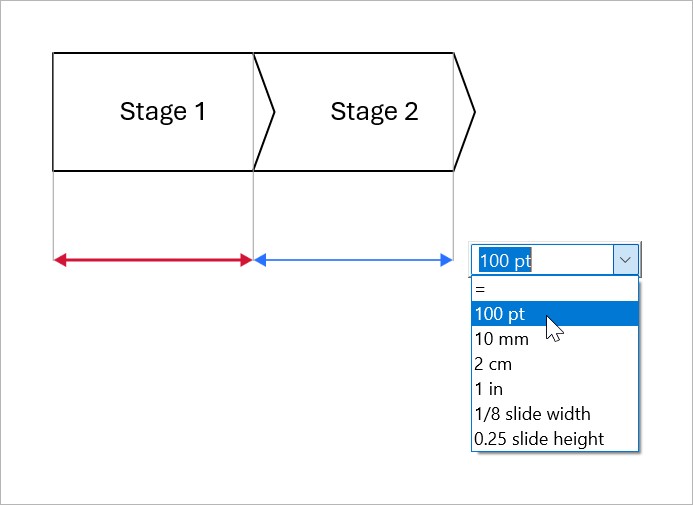
When specifying the width or height of an element, you can use the following units:
- Points (pt)
- Millimeters (mm)
- Centimeters (cm)
- Inches (in)
- Proportion of slide width (slide width)
- Proportion of slide height (slide height)
Remove size-constraint arrows
To remove the size-constraint arrows from all matched elements, right-click one of the matched elements to open the context menu, then select Any Width 

To remove a size-constraint arrow from one of the matched elements, select a matched element, then do one of the following:
- Select the size-constraint arrow, then select Delete.
- Right-click the size-constraint arrow to open the context menu, then select Delete

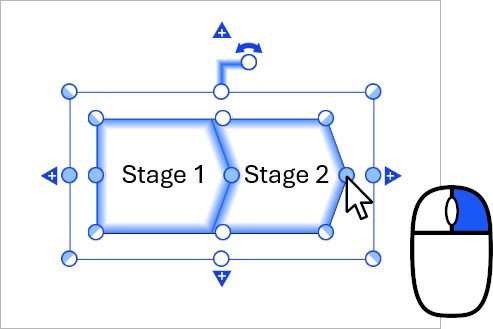
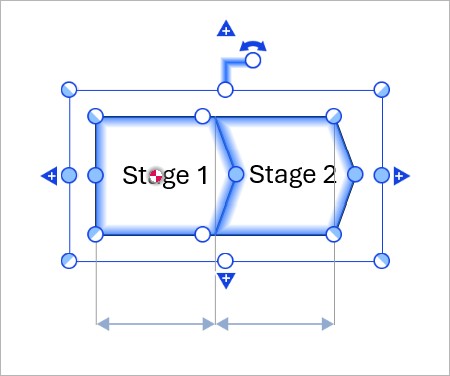
Select a reference object
Reference objects give you more control when aligning and matching sizes. When you Align objects using PowerPoint commands, the objects align to the reference object. When you Match object sizes, the objects match the dimensions of the reference object. The reference object can be a think-cell element or a PowerPoint shape.
To select a reference object, follow these steps:
- Select two or more objects, including at least one think-cell element.
- The reference object has a red and white marker at its center. To select a different reference object, hover over the object that you want until you see the marker, then select the object.
If you select multiple objects by holding down Shift and clicking, the first object that you select is the reference object.
If you select multiple objects by holding down Ctrl and clicking, the last object that you select is the reference object.
If you select multiple objects by dragging a selection frame over the objects, or by selecting Ctrl+A without first selecting an object, initially there is no reference object.
Need to troubleshoot?
Check our knowledge base