Harvey balls and checkboxes
- Home
- Resources
- User manual
- think-cell Core: Presentation basics
- Harvey balls and checkboxes
A Harvey ball is a circle divided into segments. Filled Harvey ball segments display progress states, such as a project's progress towards completion.
A checkbox is a box that you can mark with a symbol to indicate various states, such as incomplete, success, or failure.
In think-cell, you can switch between a Harvey ball and a checkbox on the element's mini toolbar. To switch from a Harvey ball to a checkbox, select the Harvey ball to open the mini toolbar, then select Checkbox ![]() . To switch from a checkbox to a Harvey ball, select the checkbox to open the mini toolbar, then select Harvey Ball
. To switch from a checkbox to a Harvey ball, select the checkbox to open the mini toolbar, then select Harvey Ball ![]() .
.
In think-cell Suite, you can link Harvey balls and checkboxes to external data sources. To learn more, see Create Harvey balls and checkboxes from Excel.
For general instructions on formatting and arranging Harvey balls, checkboxes, and other think-cell elements, see Shapes and elements.
Harvey balls
To insert a Harvey ball into your PowerPoint presentation, select Insert > think-cell > Elements > Harvey Ball ![]() . To format a Harvey ball, select the Harvey ball to open the mini toolbar. The mini toolbar has the following formatting options:
. To format a Harvey ball, select the Harvey ball to open the mini toolbar. The mini toolbar has the following formatting options:
- Completion state (see Change the completion state)
- Number of segments (see Change the number of segments)
- Filled and unfilled segment fills (see Fills)
- Outline color, line style, and weight (see Outlines)
- Size (see Resize Harvey balls and checkboxes)
- Horizontal and vertical alignment (see Change the text alignment)
- Background fill (see Fills)
Change the number of segments
By default, Harvey balls have four segments. To change the number of segments, select the Harvey ball to open the mini toolbar. On the Number of Segments dropdown menu, select the number of segments that you want. To divide a Harvey ball into a custom number of segments, in the Number of Segments text box, enter the number of segments that you want.
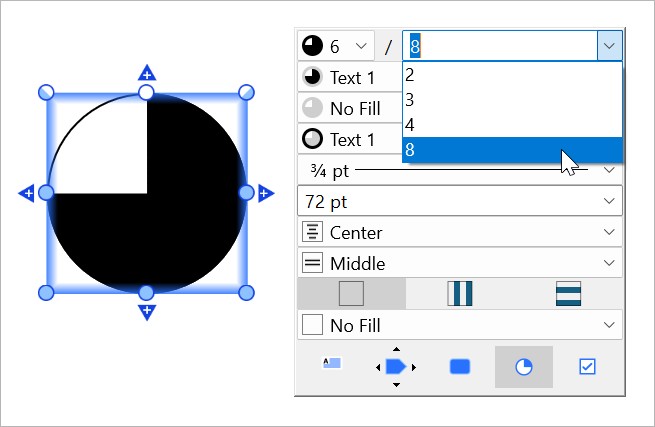

Change the completion state
Completion state refers to the filled segments of a Harvey ball. To change the completion state, select the Harvey ball to open the mini toolbar. On the Completion State dropdown menu, select the state.
To change the completion state with the keyboard and mouse, select the Harvey ball, then do one of the following:
- To increase the completion state, select + or double-click the Harvey ball.
- To decrease the completion state, select -.
- To change to a specific completion state, select 0 to 8.
- If the Harvey ball has between 1 and 8 segments, you can select between 0 and the maximum number of segments.
- If a Harvey ball has more than eight segments, selecting 0 to 8 changes the completion state in fractions of eight. For example, on a Harvey ball with 100 total segments, select 6 to fill six-eighths of the ball.
Checkboxes
To insert a checkbox into your PowerPoint presentation, select Insert > think-cell > Elements > Checkbox ![]() . To format a checkbox, select the checkbox to open the mini toolbar. The mini toolbar has the following formatting options:
. To format a checkbox, select the checkbox to open the mini toolbar. The mini toolbar has the following formatting options:
- Checkbox symbol and symbol color (see Change the checkbox symbol)
- Checkbox fill (see Fills)
- Outline color, line style, and weight (see Outlines)
- Size (see Resize Harvey balls and checkboxes)
- Horizontal and vertical alignment (see Change the text alignment)
- Background fill (see Fills)
Change the checkbox symbol
To change the checkbox symbol, select the checkbox to open the mini toolbar. On the Checkbox Symbol dropdown menu, select the check mark (✓), the X mark (✗), or an empty checkbox (☐).
To change the checkbox symbol with the keyboard, select the checkbox, then choose from the following options:
- Empty checkbox (☐): 0 or Spacebar
- Check mark (✓): 1 or v
- X mark (✗): 2 or x
To cycle through the check mark (✓), the X mark (✗), or an empty checkbox (☐), double-click the checkbox.
You can specify custom checkbox symbols in your think-cell style file. To learn more, see Customize the default checkbox styles.

Resize Harvey balls and checkboxes
To change the size of Harvey balls and checkboxes, follow these steps:
- Select the Harvey ball or checkbox to open its mini toolbar.
- In the Size combo box, do one of the following:
- In the text box, enter a value and unit. For example, enter
12 mmor1/2 slide height. If you don't enter a unit, think-cell interprets the value in points (pt). - On the dropdown menu, select a size.
- In the text box, enter a value and unit. For example, enter
When resizing Harvey balls and checkboxes, choose from the following units:
- Points (pt). Use this unit to easily match the element's size to a font size on your slide.
- Millimeters (mm)
- Centimeters (cm)
- Inches (in)
- Proportion of slide width (slide width)
- Proportion of slide height (slide height)

Need to troubleshoot?
Check our knowledge base