Configure the think-cell Library
- Home
- Resources
- User manual
- Deployment guide
- Configure the think-cell Library
As an administrator, you can configure the think-cell Library for users in your organization as follows:
- Select predefined library sources that always appear in the library. Standard users can't hide, reorder, or otherwise modify these sources.
- Enable or disable access to the library deployment settings where users with local administrator accounts can edit predefined library sources.
- Enable or disable specific library sources.
- Connect a Brandfolder account to the library and configure the Brandfolder menus.
On Windows, configure the library in group policies (see Group policies) or during installation with command-line parameters (see Installation on Windows).
On Mac, configure the library with the defaults command-line tool (see Installation on macOS) or a device management solution (see Managed deployment on macOS).
think-cell Library sources
The think-cell Library supports the sources in the following table.
|
Content |
Content location |
Available on Windows |
Available on Mac |
|
|---|---|---|---|---|
|
New folder |
Slide and image assets |
Local computer |
yes |
|
|
Network drive(s) |
yes |
|||
|
SharePoint/OneDrive |
yes |
|||
|
Slide Templates |
Slide templates |
Local computer |
yes |
yes |
|
Freepik |
Icons |
Online provider |
yes |
yes |
|
Pexels |
Stock images |
Online provider |
yes |
yes |
|
Unsplash |
Stock images |
Online provider |
yes |
yes |
|
Brandfolder |
Image assets |
Online provider |
yes |
yes |
|
Canto |
Image assets |
Online provider |
yes |
yes |
|
Getty Images |
Stock images |
Online provider |
yes |
yes |
Configure predefined library sources
As an administrator, you can configure the think-cell Library to always display certain sources. Standard users can't hide, reorder, or otherwise modify these sources. The predefined sources always appear at the top of the library source list.
If you disable a library source (see Enable or disable specific library sources), users with local administrator accounts can still add the disabled source to the predefined sources in the library deployment settings. However, any changes to the predefined library sources only apply to that user's account, as a preview, unless the user exports and deploys the sources to other users using think-cell configuration parameters. You can Enable or disable access to library deployment settings.
To configure predefined library sources, follow these steps:
Arrange predefined sources in the library
To select and order predefined library sources, follow these steps:
- On your computer, sign in to a local administrator account.
- In PowerPoint with think-cell installed, on the Insert tab, select Library.
- Open the library deployment settings: select Configure Library


-
Edit the predefined sources.
- To add a source, select the plus sign (🞡) beside its label.
- To add slide and image assets via New folder, see Asset folders as predefined library sources.
- If adding Brandfolder, don't add the API key in the library deployment settings. To distribute an API key to users in your organization, see Add a Brandfolder account to the library.
- To remove a source, select the X mark (✕) beside its label.
- To reorder the predefined sources, drag their labels.
To revert your edits to the predefined sources, select Revert.
- To add a source, select the plus sign (🞡) beside its label.
- When you're finished, select Export. A string that encodes your predefined sources is copied to your clipboard.
- Proceed with the instructions in Deploy predefined sources.
Asset folders as predefined library sources
This section explains how to add folders with slide and image assets to the predefined library sources on Windows and Mac.
Add asset folders on Windows
This section provides generic instructions for adding folders with slide and image assets to the predefined library sources, as well as specific instructions for SharePoint folders (see Add SharePoint folders).
If you want the think-cell Library to update for all users whenever someone edits a centrally deployed asset folder, add a folder from a network drive or SharePoint.
If you don't plan to centrally update an asset folder, or if you plan to update the folder only occasionally, you can add a folder from users' local storage or personal OneDrive.
To add a folder with slide and image assets to the predefined library sources, follow these steps:
- Open the think-cell Library deployment settings (see Arrange predefined sources in the library, steps 1 to 3).
- Select New folder. The Select a folder dialog will open.
- Specify the folder that you want to add. Users must be able to access the folder through the same absolute path (see Specify absolute paths to asset folders).
- If the path contains environment variables, close the Select a folder dialog. In the think-cell Library dialog, in Folder Path, enter the folder path. Then select Enter.
- If you don't need to use environment variables—for example, if the folder is on a network drive—you can use the Select a folder dialog to select the folder that you want.
- In the think-cell Library dialog, in Label, the library folder label matches the original folder's name. If you want to, you can enter a new folder label.
- When you're finished arranging the predefined sources, select Export. A string that encodes your predefined sources is copied to your clipboard.
- Proceed with the instructions in Deploy predefined sources.
Add SharePoint folders
On Windows, you can add folders in SharePoint to the predefined library sources. Whenever someone edits the folder, these edits appear in the think-cell Library.
To add a SharePoint folder to the predefined library sources, follow these steps:
- Make sure that the SharePoint folder is synced to all users' computers. For example, if the folder is in a SharePoint library on a team site, configure the the library to sync automatically (see Configure team site libraries to sync automatically).
- Open the think-cell Library deployment settings (see Arrange predefined sources in the library, steps 1 to 3).
- Select New folder. The Select a folder dialog will open. Close this dialog.
- In the think-cell Library dialog, in Folder Path, enter the folder path. Then select Enter.
Users must be able to access the folder through the same absolute path (see Specify absolute paths to asset folders). If you've synced a SharePoint library using the example in step 1, the path to the library will be%USERPROFILE%\SHAREPOINT_NAME\TEAM_SITE_NAME - LIBRARY_NAME. - In the think-cell Library dialog, in Label, the library folder label matches the original folder's name. If you want to, you can enter a new folder label.
- When you're finished arranging the predefined sources, select Export. A string that encodes your predefined sources is copied to your clipboard.
- Proceed with the instructions in Deploy predefined sources.
Add asset folders on Mac
The think-cell Library requires think-cell index files in order to read a folder and display its contents. When you add a folder to the think-cell Library on Windows, think-cell automatically creates hidden index files for that folder.
think-cell cannot create index files on Mac. However, the think-cell Library can read an asset folder on Mac if you first add the folder to the library on Windows, then add the asset folder with the index files to the library on Mac.
If you want the library to update whenever someone edits the folder, see Add asset folders on Mac via a network drive.
If you don't plan to update an asset folder, or if you plan to update the folder only occasionally, see Add asset folders on Mac via local storage.
On Mac, you can add folders in SharePoint to the predefined library sources, but the library won't update when someone edits the folder.
Add asset folders on Mac via a network drive
If you want the library on Mac to update whenever someone edits an asset folder, add the folder to the predefined sources via a network drive.
- Add the folder to a network drive, with the following criteria:
- The network drive is shared across Windows and Mac (see Connect your Mac to shared computers and servers).
- The folder is shared with a Windows computer where someone regularly uses think-cell. This ensures that the index files will update when the folder contents change.
- On Windows, add the asset folder to the library (see Add assets to the library on Windows).
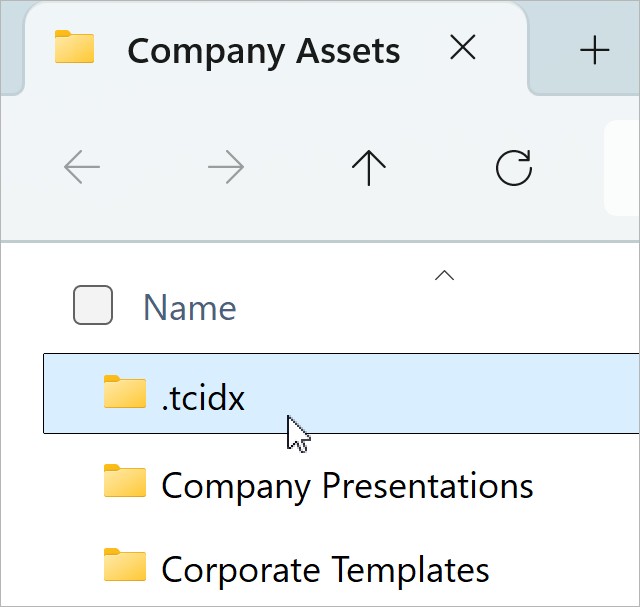
- In the asset folder, you should now see a subfolder called
.tcidx. If you don't see.tcidx, ensure that hidden files are visible in File Explorer.
- On Mac, open the think-cell Library deployment settings (see Arrange predefined sources in the library, steps 1 to 3).
- Select New folder. The Open dialog will open.
- Specify the folder that you want to add. Users must be able to access the folder through the same absolute path (see Specify absolute paths to asset folders).
- If the path contains the tilde (~) character, close the Open dialog. In the think-cell Library dialog, in Folder Path, enter the folder path. Then select Enter.
- If you don't need to use the tilde character, you can use the Open dialog to select the folder that you want.
- In the think-cell Library dialog, in Label, the library folder label matches the original folder's name. If you want to, you can enter a new folder label.
- When you're finished arranging the predefined sources, select Export. A string that encodes your predefined sources is copied to your clipboard.
- Proceed with the instructions in Deploy predefined sources.
Add asset folders on Mac via local storage
If you don't plan to update an asset folder, or if you plan to update the folder only occasionally, you can add the folder to the predefined sources via local storage.
- On Windows, make sure that the asset folder isn't synced to a cloud storage provider such as OneDrive, otherwise the index files may not appear in the folder.
- On Windows, add the folder to the library (see Add assets to the library on Windows).
- In the asset folder, you should now see a subfolder called
.tcidx. If you don't see.tcidx, ensure that hidden files are visible in File Explorer.
- Copy the asset folder with the index files to users' local storage on Mac.
- On Mac, open the think-cell Library deployment settings (see Arrange predefined sources in the library, steps 1 to 3).
- Select New folder. The Open dialog will open.
- Specify the folder that you want to add. Users must be able to access the folder through the same absolute path (see Specify absolute paths to asset folders).
- If the path contains the tilde (~) character, close the Open dialog. In the think-cell Library dialog, in Folder Path, enter the folder path. Then select Enter.
- If you don't need to use the tilde character, you can use the Open dialog to select the folder that you want.
- In the think-cell Library dialog, in Label, the library folder label matches the original folder's name. If you want to, you can enter a new folder label.
- When you're finished arranging the predefined sources, select Export. A string that encodes your predefined sources is copied to your clipboard.
- Proceed with the instructions in Deploy predefined sources.
Specify absolute paths to asset folders
Users must be able to access a folder in the predefined library sources through the same absolute path. To centrally specify the same absolute path for each user, you can use environment variables on Windows or the tilde (~) character on Mac.
See the following examples:
- Windows: Specify
C:\Users\USERNAME\Templatesas%USERPROFILE%\Templates. - Mac: Specify
/Users/USERNAME/Templatesas~/Templates.
Deploy predefined sources
After you generate the string that encodes your predefined sources (see Arrange predefined sources in the library), add the string to your configuration parameters. To do so, proceed with the following instructions for Windows or Mac.
If you don't add the string to the configuration parameters, your saved changes to the predefined sources apply to your account only.
Group policies
To deploy predefined library sources with Group policies, follow these steps:
- Open the group policy setting Library Dialog: Predefined Library Sources.
- Select Enabled.
- In Paste here, paste the string that encodes your predefined sources.
- Select OK.
To remove the predefined sources configuration, in Library Dialog: Predefined Library Sources, select Not Configured or Disabled. Then select OK.
Installation command line
To deploy predefined library sources with installation command-line parameters (see Installation on Windows), run the think-cell installation file with the following parameter. Replace PREDEFINED_SOURCES with the string that encodes your predefined sources.
LIBRARY=<var>PREDEFINED_SOURCES</var>To remove the predefined sources configuration, run the think-cell installation file with the following parameter:
LIBRARY=""To deploy predefined sources with the defaults tool (see Installation on macOS), use the following command. Replace PREDEFINED_SOURCES with the string that encodes your predefined sources.
sudo defaults write /Library/Preferences/com.microsoft.office.plist com.think-cell.settings.library -string <var>PREDEFINED_SOURCES</var>To deploy predefined sources with a .plist file for a device management solution (see Managed deployment on macOS), use the following code. Replace PREDEFINED_SOURCES with the string that encodes your predefined sources.
<dict>
	<key>com.think-cell.settings.library</key>
  	<string><var>PREDEFINED_SOURCES</var></string>
</dict>To remove the predefined sources configuration, remove the com.think-cell.settings.library key from the com.microsoft.office property list.
Enable or disable access to library deployment settings
Users with local administrative rights can access library deployment settings, which allow them to create a list of predefined sources (see Configure predefined library sources). As an administrator, you can enable or disable access to library deployment settings for users with local administrative rights. Standard users can't access library deployment settings.
To enable or disable access to library deployment settings, use the following configuration parameters.
Disable access to library deployment settings
To disable access to library deployment settings with Group policies, follow these steps:
- Open the group policy setting Library dialog: Admin Mode.
- Select Disabled.
- Select OK.
To disable access to library deployment settings with installation command-line parameters (see Installation on Windows), run the think-cell installation file with the following parameter:
DISABLELIBRARYADMINMODE=1Enable access to library deployment settings
To enable access to library deployment settings with Group policies, follow these steps:
- Open the group policy setting Library dialog: Admin Mode.
- Select Enabled.
- Select OK.
To enable access to library deployment settings with installation command-line parameters (see Installation on Windows), run the think-cell installation file with the following parameter:
DISABLELIBRARYADMINMODE=0To disable access to library deployment settings with the defaults tool (see Installation on macOS), use the following command:
sudo defaults write /Library/Preferences/com.microsoft.office.plist com.think-cell.settings.DisableLibraryAdminMode -bool trueTo disable access to library deployment settings using a .plist file for a device management solution (see Managed deployment on macOS), use the following code:
<dict>
	<key>com.think-cell.settings.DisableLibraryAdminMode</key>
	<true/>
</dict>To enable access to library deployment settings, set the Boolean value of DisableLibraryAdminMode to false.
Enable or disable specific library sources
As an administrator, you can enable or disable library sources for users in your organization. Standard users can't use or see disabled library sources. However, users with local administrative rights can see disabled sources in the library deployment settings (see Configure predefined library sources).
You cannot disable New folder (see Add your slide and image assets to the library).
To enable or disable library sources, use the following configuration parameters.
Disable library sources
To disable specific library sources with Group policies, follow these steps:
- Open the group policy setting Library dialog: Other Providers.
- Select the sources you want to disable.
- To disable specific sources, select Enabled. Then deselect any of the following sources:
- Canto
- Freepik
- Getty Images
- Pexels
- Templates
- Unsplash
- To disable all sources listed in this setting, select Disabled.
- To disable specific sources, select Enabled. Then deselect any of the following sources:
- When you're finished, select OK.
To disable Brandfolder with group policies, open the group policy setting Library dialog: Brandfolder. Select Disabled, then select OK.
To disable a library source with installation command-line parameters (see Installation on Windows), run the think-cell installation file with the source's parameter set to 1. For example, to disable Brandfolder, use the following command-line parameter:
STOCKIMAGESDISABLEBRANDFOLDER=1For a table of all command-line parameters for library sources, see the end of this section.
Enable library sources
To enable library sources with Group policies, follow these steps:
- Open the group policy setting Library dialog: Other Providers.
- Select Enable. All sources in this setting will be selected. If you only want to enable some sources, select these sources only.
- Select OK.
To enable Brandfolder with group policies, in the group policy setting Library dialog: Brandfolder, select Not Configured, then select OK.
To enable a library source with installation command-line parameters (see Installation on Windows), run the think-cell installation file with the source's parameter set to 0. For example, to enable Brandfolder, use the following command-line parameter:
STOCKIMAGESDISABLEBRANDFOLDER=0A complete list of command-line parameters for library sources appears in the following table.
Command-line parameters
The following table describes all command-line parameters for enabling and disabling library sources.
|
Library source |
Parameter |
Values |
|---|---|---|
|
Brandfolder |
|
|
|
Canto |
|
|
|
Freepik |
|
|
|
Getty Images |
|
|
|
Pexels |
|
|
|
Slide Templates |
|
|
|
Unsplash |
|
|
Disable library sources
To disable a source, in the com.think-cell.settings.stockimages dictionary, set the Boolean value of the source's key to true.
For example, to disable Brandfolder with the defaults tool (see Installation on macOS), use the following command:
sudo defaults write /Library/Preferences/com.microsoft.office.plist com.think-cell.settings.stockimages -dict-add DisableBrandfolder -bool trueTo disable Brandfolder when editing a .plist file for a device management solution (see Managed deployment on macOS), use the following code:
<dict>
	<key>com.think-cell.settings.stockimages</key>
	<dict>
		<key>DisableBrandfolder</key>
		<true/>
	</dict>
</dict>Enable library sources
To enable a library source, set the Boolean value of the source's key to false.
Configuration parameters
The following table describes all configuration parameters for disabling and enabling library sources.
|
Library source |
Key |
Values |
|---|---|---|
|
Brandfolder |
|
|
|
Canto |
|
|
|
Freepik |
|
|
|
Getty Images |
|
|
|
Pexels |
|
|
|
Slide Templates |
|
|
|
Unsplash |
|
|
Configure Brandfolder
Brandfolder is a digital asset management platform. Users and administrators can add a Brandfolder account to the think-cell Library. When an administrator adds a Brandfolder account to the library for users in their organization, users can't add a different Brandfolder account. Administrators can configure the Brandfolder library menus.
Add a Brandfolder account to the library
To add a Brandfolder account to the library, follow these steps:
Retrieve a Brandfolder API key
To retrieve the API key from your Brandfolder account, follow these steps:
- Sign in to Brandfolder.
- Go to Integrations and find your API key. Copy the key to your clipboard.
Add a Brandfolder API key to the library
To add the Brandfolder API key to the library, use the following configuration parameters.
Group policies
To add a Brandfolder account to the library with Group policies, follow these steps:
- Open the group policy setting Library dialog: Brandfolder.
- Select Enabled.
- In Brandfolder API Key, paste the API key that you copied from Brandfolder.
- Select OK.
To remove the Brandfolder account from the library, in Library dialog: Brandfolder, delete the API key. Then select OK.
Installation command line
To add a Brandfolder account to the library with installation command-line parameters (see Installation on Windows), run the think-cell installation file with the following parameter. Replace BRANDFOLDER_API_KEY with the API key you copied from Brandfolder.
STOCKIMAGESBRANDFOLDERAPIKEY=<var>BRANDFOLDER_API_KEY</var>To remove the Brandfolder account from the library, run the think-cell installation file with the following parameter:
STOCKIMAGESBRANDFOLDERAPIKEY=""To add a Brandfolder account with the defaults tool (see Installation on macOS), use the following command. Replace BRANDFOLDER_API_KEY with the API key you copied from Brandfolder.
udo defaults write /Library/Preferences/com.microsoft.office.plist com.think-cell.settings.stockimages -dict-add BrandfolderAPIKey -string <var>BRANDFOLDER_API_KEY</var>To add a Brandfolder account when editing a .plist file for a device management solution (see Managed deployment on macOS), use the following code. Replace BRANDFOLDER_API_KEY with the API key you copied from Brandfolder.
<dict>
	<key>com.think-cell.settings.stockimages</key>
  	<dict>
  		<key>BrandfolderAPIKey</key>
    		<string><var>BRANDFOLDER_API_KEY</var></string>
	</dict>
</dict>To remove the Brandfolder account from the library, remove the BrandfolderAPIKey key from the com.think-cell.settings.stockimages dictionary in the com.microsoft.office property list.
Configure Brandfolder library menus
You can configure the Brandfolder menus in the library as follows:
- By default, if the Brandfolder account that you added to the library contains only one Brandfolder, the Brandfolder menu has only one option. In this case, you can hide the Brandfolder menu. If the account contains more than one Brandfolder, the menu will appear regardless.
- In the Collection and Section menus, show or hide the All option.
- Hide the Collection or Section menus.
Group policies
To configure the Brandfolder library menus with Group policies, follow these steps:
- Open the group policy setting Library dialog: Brandfolder.
- Select Enabled.
- Select any of the following options:
- Hide Brandfolder drop-down list if there is only one
- In Brandfolder Collections drop-down list, select Show, Show without "All", or Hide.
- In Brandfolder Sections drop-down list, select Show, Show without "All", or Hide.
- When you're finished, select OK.
To restore the default Brandfolder menu configuration, deselect Hide Brandfolder drop-down list if there is only one. In Brandfolder Collections drop-down list and Brandfolder Sections drop-down list, select Show. When you're finished, select OK.
Installation command line
To configure the Brandfolder library menus with installation command-line parameters (see Installation on Windows), use any of the parameters described in the following table.
|
Menu |
Parameter |
Values |
|---|---|---|
|
Brandfolder |
|
|
|
Collections |
|
|
|
Sections |
|
|
For example, to hide the Brandfolder menu if there's only one Brandfolder, show the Collections menu without All, and hide the Sections menu, run the think-cell installation file with the following parameters:
STOCKIMAGESHIDESINGLEBRANDFOLDER=1 STOCKIMAGESHIDEBRANDFOLDERCOLLECTIONS=1 STOCKIMAGESHIDEBRANDFOLDERSECTIONS=2To restore the default Brandfolder menu configuration, run the think-cell installation file with the following parameters:
STOCKIMAGESHIDESINGLEBRANDFOLDER=0 STOCKIMAGESHIDEBRANDFOLDERCOLLECTIONS=0 STOCKIMAGESHIDEBRANDFOLDERSECTIONS=0To configure the Brandfolder library menus, in the com.think-cell.settings.stockimages dictionary, specify any of the keys described in the following table.
|
Menu |
Key |
Type |
Values |
|---|---|---|---|
|
Brandfolder |
|
Boolean |
|
|
Collections |
|
integer |
|
|
Sections |
|
integer |
|
For example, to hide the Brandfolder menu if there's only one Brandfolder, show the Collections menu without All, and hide the Sections menu with the defaults tool (see Installation on macOS), use the following command:
sudo defaults write /Library/Preferences/com.microsoft.office.plist com.think-cell.settings.stockimages -dict-add HideSingleBrandfolder -bool true HideBrandfolderCollections -int 1 HideBrandfolderSections -int 2To configure the same settings with a .plist file for a device management solution (see Managed deployment on macOS), use the following code:
<dict>
	<key>com.think-cell.settings.stockimages</key>
	<dict>
		<key>HideSingleBrandfolder</key>
		<true/>
		<key>HideBrandfolderCollections</key>
		<integer>1</integer>
		<key>HideBrandfolderSections</key>
		<integer>2</integer>
	</dict>
</dict>To restore the default Brandfolder menu configuration, set the value of HideSingleBrandfolder to false and the values of HideBrandfolderCollections and HideBrandfolderSections to 0.
Need to troubleshoot?
Check our knowledge base