14. Introduction to layout
- Home
- Resources
- User manual
- Introduction to layout
When creating a PowerPoint presentation, you frequently have to create slides like this one:
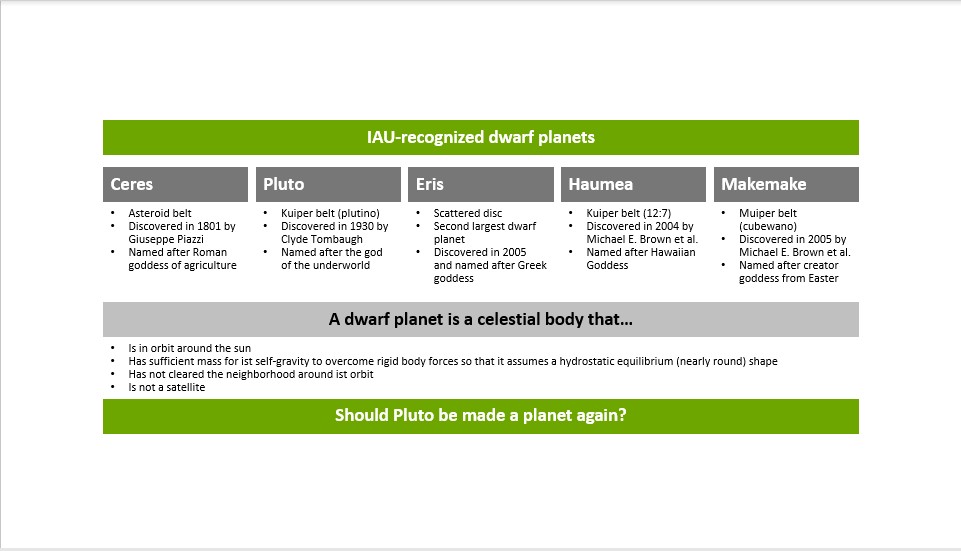
With PowerPoint alone, all your options entail unsatisfactory compromises or a lot of manual work: you may use an inflexible PowerPoint table, build up the slide with text boxes and face tedious manual adjustments after text changes, or you may use a template from PowerPoint’s SmartArt or your own custom library and soon bump into the template’s limitations.
Using think-cell, you can quickly build up complex slides like the one above from simple text boxes (see 15. Text boxes), pentagons and chevrons (see 16. Process flows). When adding text and other elements, the slide layout is continuously re-arranged and optimized automatically. Meaningful actions like snapping together, duplicating, aligning and moving elements define a smart grid so that you never need to place or resize shapes manually.
For a rectangular, structured layout of text boxes you can use our table tool. The automatic layout adjusts positions and sizes depending on the table content and allows for very quick creation. In addition, the table can be edited in a datasheet or linked to an Excel file, just like for charts (see 17. Tables).
You can also include elements other than text in the automatic layout, like images (see 18. Images and icons).
An agenda is usually also built from carefully aligned text boxes whose position and content should remain synchronized. Chapter 19. Agendas shows you how think-cell helps you with this.
A number of additional productivity tools make several tasks more efficient when working with presentations (see 21. think-cell Tools).
14.1 Lock Positions by Default
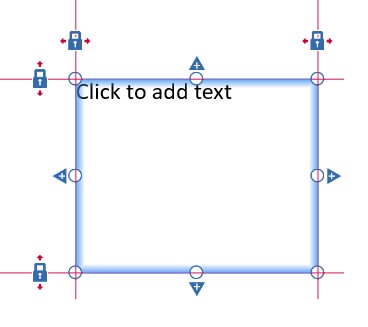
Automatic layout can be unfamiliar at first, in particular because the position and size of shapes on the slide is largely determined by think-cell, and may change when inserting new shapes or editing content. This is why the

This option makes think-cell layout elements behave a lot like native PowerPoint shapes: They have a fixed position and size on the slide, which you can set by clicking (and dragging) when the shape is selected for insertion. Moreover, you can simply drag and drop the shape to a new position on the slide, keeping its size, and use the handles on the corners and sides to drag them into a new position, changing the fixed size and position of the shape.
This is achieved by locking all four edges of the shape into position, which is why you will see four red lines with closed locks surrounding the shape when selecting it. See 15.8.2 Locking elements to a position for more detail.
All additional features of the elements discussed in the next chapters that are not related to automatic slide layout work the same regardless of whether this option is enabled or not.
Because it makes automatic layout features more easily accessible, the explanations in the following chapters assume that
